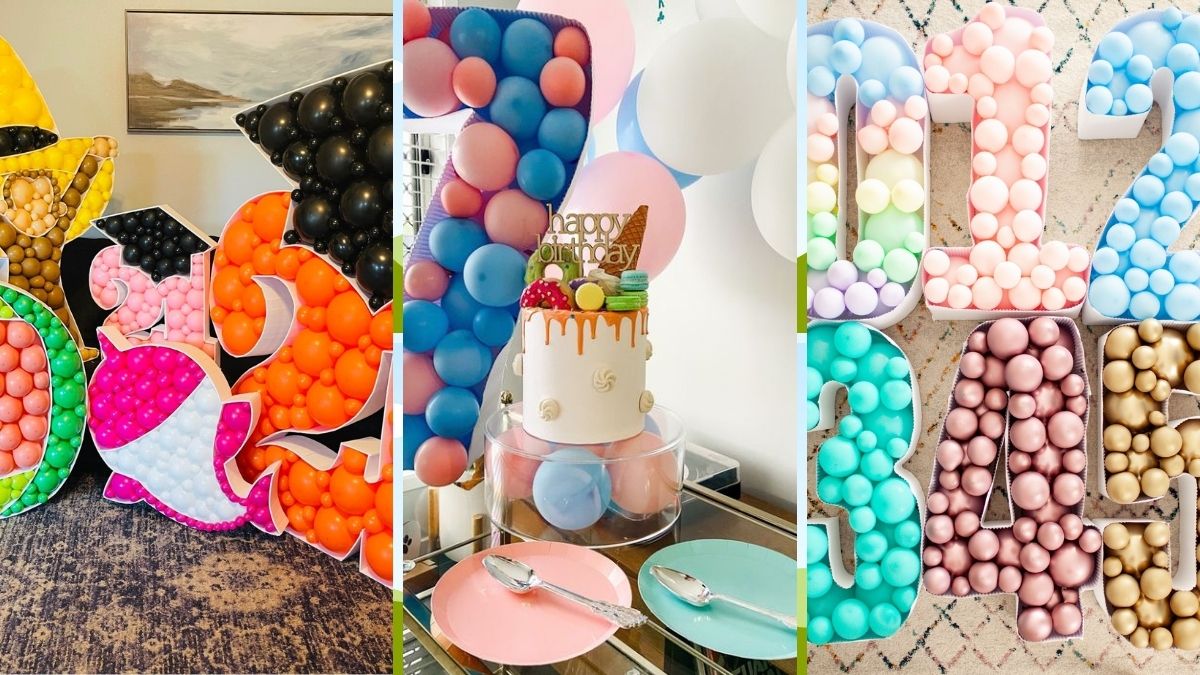
Want your next celebration to be one-of-a-kind? Let us help! Whatever your party is for, a balloon mosaic kit is just what you need. It can be used for a birthday party, a baby shower, a bridal shower, or a dinner party. Balloon mosaics are a fantastic addition to any event. You can create Mosaics with letters, numbers, icons, and logos. It may seem daunting to create this DIY at first glance, but don’t be deterred by the “wow” factor. You can also purchase the balloon mosaic kit from any superstore. With a step-by-step guide to help you make a balloon mosaic, we cover everything you need to know about how to make one. Who else is obsessed with these stunning frames? Another balloon trend set to grow is mosaic frames and balloon mosaics. Although not entirely new, these balloon trends are only going to grow.
Parties wouldn’t be complete without balloons. I’m sure that the first thing you think of when you see balloons is “party” but don’t you dread seeing the balloons that are tied together each and every time? People nowadays come up with creative balloon decoration ideas to glam up their parties.
Balloons come in all shapes and sizes, from the balloon-based gate to the balloon cupcake to the mosaic balloon. I will talk about the mosaic balloon kit which is trending nowadays along with its decorations in this blog which you should check out and which will make you want to include it in your upcoming birthday party!
What exactly is a Balloon mosaic?
The balloon mosaic is a unique type of balloon decoration that will definitely enhance and add an extra touch to your event decor! It’s possible to make balloon mosaics of numbers, letters, and even shapes. Your guests will be wowed by the design of the mosaic number balloon stands. Every birthday mosaic balloons are marked by a number in the range of 0-9 – and every one counts! The mosaic balloons have every number you need, whether it’s for a special occasion or a simple birthday. The ultimate showstopper piece for any birthday celebration! These birthday mosaic balloon kits are lightweight and easy to assemble! It is the perfect addition to your various balloon packs for your balloon mosaic stand.
What are the simple steps to make a mosaic balloon number?
Are there any other mosaic balloon number frame fans out there? It is pretty common to use them to decorate for events even though they aren’t entirely new. Just like the Balloon Wall Mural, they are relatively very easy to create and are also budget-friendly.
Mosaics are extremely trendy and have become one of the most sought-after items. Custom-made letters and numbers made of dense foam board are usually filled with a colorful balloon of the customer’s choosing. There will be varying amounts of balloons. The amount depends on how many letters or numbers you will have. If you think you are going to need more balloons, I recommend purchasing more balloons than you think you are going to need.
Mosaic balloon number kits are considered a popular decoration for a variety of occasions, including birthdays, ceremonies, and get-togethers. Materials such as balloons and tape can be used to build these impressive structures. You know what you have to do after you’ve completed the first number, so the rest becomes easier. In a nutshell, a mosaic balloon number sculpture requires the following six steps:
- Create a number template and print it- To create the number in Word, you need to begin with designing the number format. When you are satisfied with the design which you have made, you should first save it in a PDF format so that you can further customize it using software like Adobe. You will get the opportunity to choose the size of your template in Adobe. Once the number is printed, cut it carefully from the paper so that it becomes a template.
- The foam boards should be pinned together -Now in this step, you can tape them together. It is recommended that you use six foam boards. It is recommended that you tape the boards together on both sides.
- The balloon number sculpture should be trimmed -You should then place the number template on top of your foam boards after you have taped the foams together. The template can be traced or can simply be taped on the foam. After that, you can cut out the numbers with a box cutter. Six-sided pieces should be made after cutting the number out. Ensure that each piece of foam board has three sides.
- Gather the sculptures of the numbers -You should use a glue gun to attach each side to its right place. The sides of the number should be glued at their edges. The slide sides should surround the number.
- Inflate and put balloons inside-Once you have completed creating the number frame, it’s time to fill the balloons with air. When balloons are of different sizes, it creates a mosaic effect that looks great.
- Create a mosaic Appearance-Following the filling of the balloons, glue dots should be used to attach them to the wall. To create the mosaic, look of your choice, make sure to fill the entire sculpture with balloons
In the end, look over your work to determine whether it interests you. If you want to make a different number, you can also follow the same steps mentioned above.
Using large numbers: How Do You Do It?
I prefer to print the templates for the mosaic balloon number in Adobe, even though they were created in Word. The program can be downloaded free of charge. You can save ink by selecting grayscale for your template; changing the tile scale to 400% and the overlap to 0, and starting printing. You can check the preview window which will let you know how many several sheets are going to be printed and how they will be arranged.
Next, arrange all the printed templates. Verify that all the papers are lined up correctly by checking the printing preview window again. Start taping these papers together once you’re sure they are all lined up correctly. After taping them together, you need to cut the numbers out. Once you have done this, you can use the template.
What is the most affordable way of decorating a ceremony with Balloon mosaic kit?
You can decorate a ceremony in so many different ways. Some people will go for the expensive stuff, but mosaic balloon number sculptures are an easy way to decorate with a low-budget plan because they can easily be made yourself. Furthermore, the materials for making these sculptures can be readily obtained at a low cost. So, it is always advisable to get a mosaic balloon kit so that you can obtain your desired mosaic look. It is your responsibility to follow all the steps outlined in this blog if you are thinking about purchasing a balloon mosaic number frame for your party.
To add Balloon mosaic kit, how do you assemble it?
Mosaic Frames for Balloons can now be purchased that require only assembly and filling. As the base of the decoration frame, the kits are made from hard Styrofoam. First, puzzle-like pieces are created, then cool melt glue is used to secure the pieces together. A corrugated cardboard roll is used as the edge, which is glued in place. Various distributors sell these frames throughout the world.
Easily create a show-stopping decoration by adding and combining balloons to the mosaic frame kit. Anyone can do it, whether they’re balloon decorators or DIY parents. You can choose from over 110 balloon shapes. Normally, it takes between 20 and 60 minutes to assemble a complete frame that is included in the mosaic kit. This frame has a back wall constructed from a hard styrofoam plate cut into small pieces similar to a puzzle. Once assembling it, the pieces are then tightly fitted together. A corrugated cardboard roll is included in the package for the sidewall, which can be bent into any shape and curve. A glue stick is needed to attach the roll to the wall. It can be cut into shorter pieces, if necessary, with scissors. According to the shape, the sidewalls measure normally like 4,3 inches and 2,1 inches. Besides the back wall (numbers 0-9, swans, mermaids, rockets, sharks, and more than 100 other shapes) are also available in the market, the package usually contains a sidewall made of corrugated cardboard as well as detailed visual instructions.
What are the Instructions and steps to follow?
- Take the styrofoam-like pieces and place them in order according to the included instructions.
- Use a low-temperature glue gun to glue the puzzles together! Do not let the glue get too hot if you do not want to melt the Styrofoam. Once the styrofoam plate serving as the base of the decoration frame has been glued, you can proceed to paste the bottom plate.
- Once the corrugated cardboard is ready, glue and fix it to the edges and sides of the back wall. Work from the bottom up if there is a frame. If not, it doesn’t matter.
- For the corrugated side to face inward, glue the cardboard so that the smooth side faces out.
- Be sure to glue one short piece of cardboard one at a time, letting the glue cool/dry a little before glueing the next piece. As you continue to glue the cardboard sidewall to the styrofoam back wall, you will have completed the step.
- It is very simple to use because the cardboard roll included is fully adjustable to any shape and curve, so the procedure is quite straightforward. Glue the remaining cardboard length to the base itself to complete the look. Cut the loose ends of the cardboard with the help of scissors and cut off the excess with scissors.
- It is possible to fill the decoration frame with balloons of all sizes and colours once it is assembled. Glue guns or double-sided adhesive tape can be used to attach balloons to the frame. Attach the big balloons first, and fill the rest of the space with small balloons in a natural way. Maintain the shape of the design by not pressing balloons against the cardboard wall. Be sure that the balloon can fit comfortably and accurately into the area where you are planning to attach it before you tie it. The frame itself can be used to determine the balloon’s size. The design will remain sharp and clear this way.
Your get-together will be sure to impress when you host it with this blog. The balloon mosaic kit is a great decoration for any occasion, whether you are celebrating something informal or something more formal. You don’t have to be a genius to do it. The main thing is to make it your own. Make your mosaic stand out by selecting colourful balloons and other extras, such as fresh flowers. So, do you want your party attendees to be amazed? In this case, LED lights and drapes would be perfect as well as mosaic balloon bunches.
Just by changing the balloon colour, this decoration works for both girls’ and boys’ birthday parties. These type of decorations are usually loved by all generations since it looks very colorful and unique. Let your party shine with these decorations.
So, isn’t that fun and great? It is easy to assemble as well since these numbers are usually being letters, last names, or even just shapes, like square backdrops! While these balloon mosaics took more time to make than a balloon garland, and I am not sure how nicely they would be holding up outdoors when exposed to wind, water, humid, cold or extreme temperatures, you will certainly enjoy them while making and creating this balloon mosaic.
Use them on your next anniversary or other big celebration – they are perfect for any milestone occasion. So, take some time to create a conversation piece for the next party you throw!
Also read,